My Shed Build
- Hannah Riley
- Sep 23, 2025
- 3 min read


In the summer of 2023, I decided to design and build something that was my own. A house was out of the picture, but a shed was the perfect, small opportunity. I wanted something I could transport to my home in the future (transportable) and something modern. I had four months to design and build while working part-time, a few vacations, and getting ready to move to Australia for a year. Here is that build.
Day 1: Excavation - July 18th, 2023
I had a bit of a slope to my site, but I also had a skid steer so I couldn't complain


July 23rd - Footer Construction Begins
I used some string, corner stakes, and a level to check for level
I also used some bigger rocks to reduce the amount of concrete I needed. My soil here is very hard and compact


July 26 - Floor Framing and Getting More Lumber
I had the luxury (or Deprovision) of using spare lumber from old builds. This was actual 2x8 rough sawn lumber that I ripped down to 2x4 lumber using my skill saw. It was quite wet and ate up a lot of blades. If I were to go back, I would have bought new lumber.


July 28th - The walls go up
It was constructed on the floor and leaned up. Then braced using a spare 2x4
The far long wall tipped back onto the hill in the back.. all was good


Break for a busy work period*
August 25th - Roof Framing, Roof Sheeting, Wall Sheeting, Waterproofing
This is were the shed will go from seeming rather flimsy and like it will fall over, to a sturdy shed that nothing will take down. Sheer make s a lot of difference!
I learned that I didn't account for the width of the sub-fascia to attach to my rafters and be flush with the walls that come out, so instead of cutting the rafters, I put my sub-fascia in-between them. My fascia in the end looks good but I changed this in the cut list for the plans on Etsy


Another break for some Colorado Mountain Time*
October 9th - Waterproofing Finished, Door Framing and installing
I had the luxury (Again?) Of using bits and pieces of waterproofing. So it looks a bit funky
The door is 4' wide because I wanted to be able to pull in my dirtbike. It is extra sturdy so I can someday make my dream hydraulic drop down ramp/door combo. The connections are chiseled out
The door installation is the single only thing I had help on - it was a heavy one and I did not want to risk it falling through to the inside... or back on top of me


October 11th - Metal Begins
I ordered my metal from my local building supplier. The plans state exactly what you need to order from the fascia, soffit, drip edge, roofing and siding quantities and profiles
My metal costs $1,438


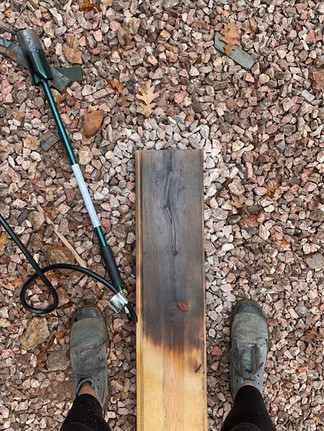
October 15th - Shou-Sugi-Ban Siding Begins
Using some old tongue and grove siding, I bought a weed burner and some propane and got to burning. The dryer the wood, the better and more even the burn will be. The edges burn more easily and any knots do not burn as easily. I was a really relaxing, meditative process especially with the remoteness of my site
Charring the wood is a Japanese method that treats the wood and protects against rot and decay. I love the look of it and that it doesn't use any chemical. A lot of people finish it with a clear coat afterward, I left it


October 24th - Construction Finished
I didn't get much time to enjoy the finished product as this evening I was flying off to Australia for a year (partly why I needed a shed)


Closing thoughts
The single thing that took the longest chunk of my time was ripping the rough sawn lumber which is pretty funny
The plans I first created for myself to go off of changed after constructing this shed


Modification Options
If you want to insulate your shed, or honestly, cut out two steps, you could make all of your walls 2x6's This allows you to get R-21 if using batt. If you want a healthier alternative, use rockwool for R-23. If you want to beef up that insulation, add closed-cell spray foam
Siding - Feel free to mix up your siding, maybe you want to match your current house or you want a less modern look. This is the easiest thing to get creative on. Just make sure you are considering what water will do
Plans available on my Etsy NoKnavishDesign


Comments